English
 Español

Content
- 1 Rethinking the Chocolate Depositor: A Practical Guide for Makers and Operators
- 2 What to check first when the depositor misbehaves
- 3 Temperature and viscosity — the twin levers you can control
- 4 Nozzles, needles, and filling geometry — often overlooked but decisive
- 5 Pumps and drives — a maintenance mindset
- 6 Integration with tempering, conveyors, and cooling
- 7 Hygiene and cleaning — simple routines that save money
- 8 Calibration and verification — simple checks you can trust
- 9 Operator training — the multiplier effect
- 10 Troubleshooting scenarios and what to try first
- 11 Purchasing and specification — what to ask your supplier
- 12 Small changes with large returns — a short list
- 13 Checklist you can use tomorrow
- 14 Keep it practical, and the machine will keep working
Rethinking the Chocolate Depositor: A Practical Guide for Makers and Operators
Opening — a small machine with steady influence
You walk onto a production floor, and machines hum in patterns that make sense to the crew. Somewhere along the line, a chocolate depositor is doing one quiet, repetitive thing: placing chocolate where it needs to be, time after time. It doesn't shout value, but when it's right the whole line hums a little easier; when it's wrong the team notices immediately. This guide is written for the people who live with depositors — engineers, plant managers, production supervisors, and technicians — and aims to translate common operational questions into practical steps you can apply this week.
The depositor's everyday job — a plain-language look
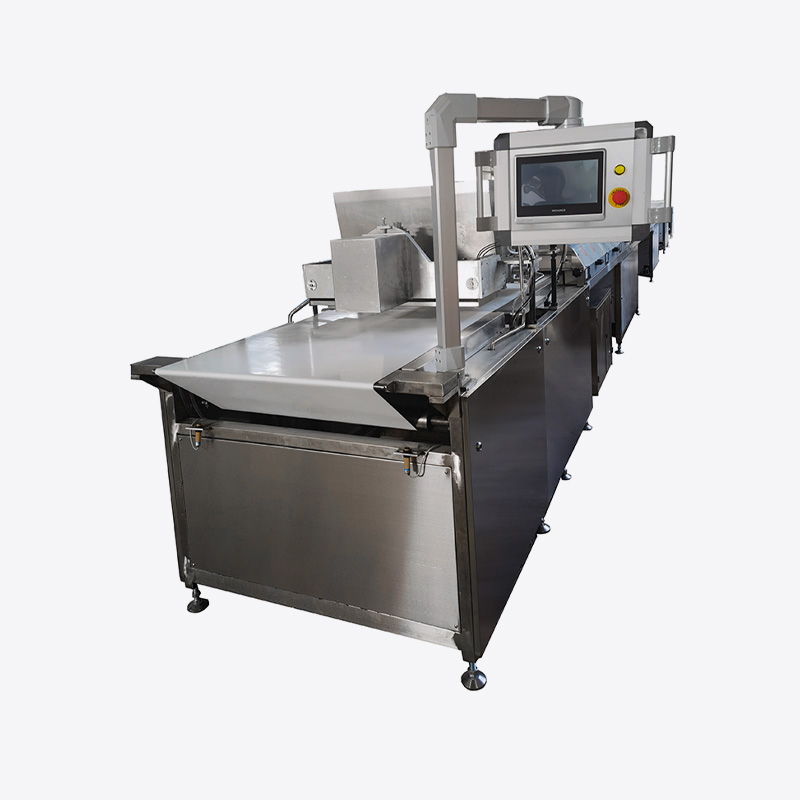
At the simplest level, a depositor meters chocolate or filling, places it precisely in a mold or on a carrier, and repeats this across thousands of cycles. But within that simple loop are variables that change everything: chocolate temperature, viscosity, nozzle design, pump wear, air in lines, operator choice, and the geometry of the molds. A depositor that can adapt to those variables without constant tinkering will save hours of downtime and cuts waste.
Think of the depositor as a precision tool, not a black box. It has inputs you can measure and manage, and outcomes you can observe and improve. The core inputs are material condition, mechanical condition, and process controls. Treat those three well and the outcomes — portion accuracy, product appearance, and throughput — follow.
A short, useful story from the floor
At a mid-sized confectionery, a longtime technician kept fiddling with a depositor every morning. Every batch started slightly off: one side more filled, another side with a tiny air pocket. After a week the manager asked the technician to walk a new engineer through the starting routine. The engineer measured temperatures, watched the pump stroke, and found a simple step missing: the hopper lid was being opened during warm-up, letting cool air in and forming a slight skin at the top. Once they changed the warm-up routine and kept the hopper closed until the machine reached steady-state, the fill uniformity returned and the morning fiddling stopped. The lesson: small details in startup routines create most of the headaches.
What to check first when the depositor misbehaves
If a depositor starts misfiring, don't dive into major repairs immediately. Work through this short list in order — it catches the common problems faster than guessing at parts.
- Material condition: Is the chocolate at the right working temperature? Is it showing signs of crystallization or an uneven mix?
- Air and vacuum: Is there air trapped in feed lines or pumps? Even small air pockets change shot size.
- Nozzle condition: Are the nozzles partially blocked or worn? Check for chocolate buildup or eroded edges.
- Pump performance: Is the pump cycling smoothly? Are seals weeping or is the pump slipping?
- Control signals: Are sensors and encoders returning sensible values? Look for intermittent wiring or noisy encoders.
- Mechanical linkages: Are cams, rods, and bearings tight and lubricated? Slop in linkages shifts timing and volume.
- Hopper and agitation: Is the hopper agitation adequate to keep the filling homogeneous? Poor agitation is a frequent cause of inconsistent texture.
Do these checks in the listed sequence. Many stops start and stop in production are ultimately traced to material or air issues rather than exotic mechanical failures.
Temperature and viscosity — the twin levers you can control
Chocolate behaves differently across a narrow range of temperatures. The operator who understands how viscosity shifts with degrees will find solving deposit problems much easier.
Practical approach:
- Stabilize temperature in stages. Give tempering and hopper systems time to reach steady-state before starting the depositor.
- Avoid local cold spots. Insulate lines and hoppers where practical; heat loss in short runs creates inconsistent flow.
- When changing recipes, allow a controlled ramp rather than a cold swap. Sudden changes in material composition or temperature prompt air ingestion and inconsistent shots.
A note on viscosity: modern depositors often let you tweak pump speed or nozzle dwell time. Use those controls in combination with steady temperature rather than as a substitute for poor thermal management.
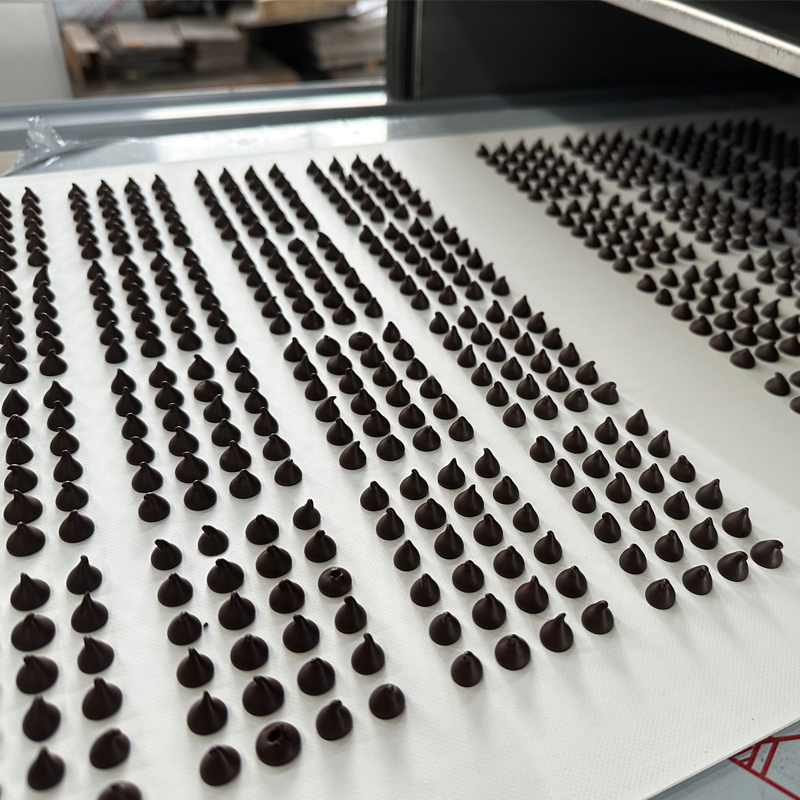
Nozzles, needles, and filling geometry — often overlooked but decisive
Nozzles sit at the product interface and therefore matter more than their cost suggests. Small changes in nozzle diameter, shape, or wear profile change product appearance and weight.
Field tips:
- Keep a small stock of nozzles for quick swaps. When troubleshooting, swap to a known-good nozzle to isolate the problem.
- Pay attention to nozzle alignment with molds. Misalignment causes thin walls or overfilling one side.
- For soft fillings, use gentle dispensing profiles. Ramp pressure slowly to avoid compressing or deforming the center.
- For multi-nozzle heads, check that each nozzle sees equal supply pressure; uneven supply is a common cause of imbalance across the head.
When in doubt, a careful visual inspection of the deposit point often reveals clues: drips, micro-splashes, or small ragged edges point to nozzle issues.
Pumps and drives — a maintenance mindset
Pumps deliver the chocolate to the depositors. They are mechanical devices subject to wear. Pump issues show up as fluctuating stroke, erratic pressure, or gradual loss of portion size.
Maintenance checklist:
- Replace seals on a preventive schedule rather than only when they fail. A tiny leak often precedes a larger disturbance.
- Monitor pump sound. A subtle change in tone often hints at cavitation or bearing wear before output changes.
- Keep spare cabins: small failures at odd hours become big downtime if you must wait for parts. Stock the items you need to get a pump running again quickly.
If your plant uses gear pumps, inspect gear wear patterns; for piston or peristaltic pumps, check tubing condition and alignment. Each pump type has its own failure modes; learn them.
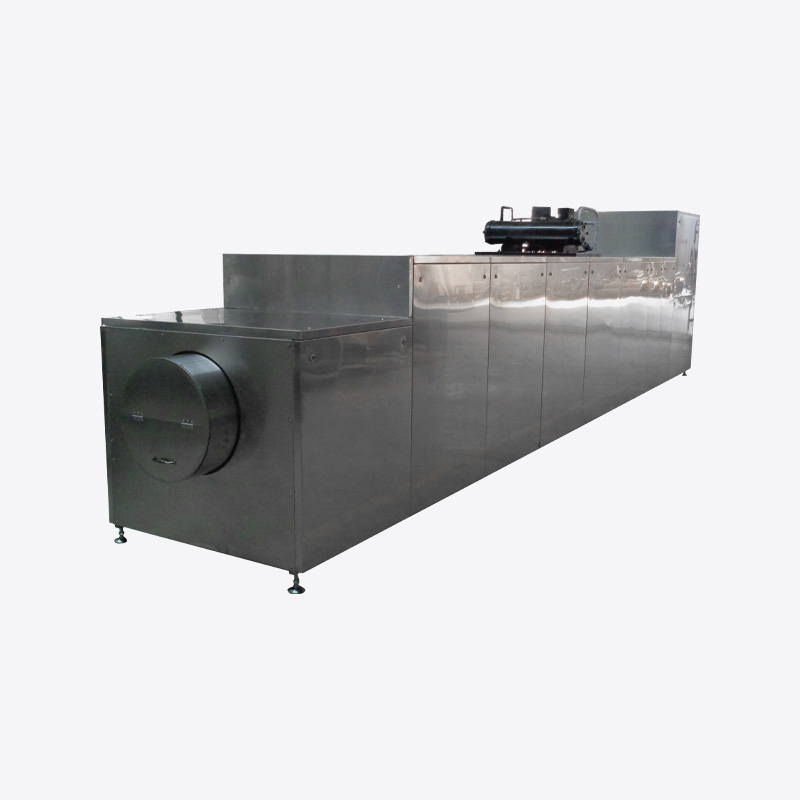
Integration with tempering, conveyors, and cooling
A depositor is not an island. It is most effective when integrated smoothly into the sequence from chocolate tempering to final cooling.
Key integration points:
- Temperer coupling: minimize the distance between tempering outlet and depositor to reduce temperature drift. A short, insulated link is better than long runs.
- Conveyor timing: ensure that conveyor indexing matches deposit timing. Slight mismatches create smear or off-center fills.
- Cooling tunnel transition: time the conveyor so freshly deposited pieces enter the cooling environment predictably. If they wait too long, bloom risks increase; if they hit cold air too quickly, surface finish suffers.
Plan transitions deliberately. A slightly slower but steady flow beats a fast but jittery line.
Hygiene and cleaning — simple routines that save money
Chocolate is food, and depositors present surfaces that contact product. Cleaning is part of quality control and also keeps depositors working well.
Practical cleaning protocol:
- Establish quick-intervention cleaning steps for brief stops and a thorough daily cleaning for full shutdowns.
- Use the manufacturer-recommended cleaning agents and procedures to avoid damaging seals or coatings.
- Keep a "cleaning map" taped near the machine showing how to disassemble common parts and which tools are required. This saves time and avoids mistakes under pressure.
- When possible, use quick-release fittings for nozzles and hoppers to reduce downtime.
A clean depositor is a predictable depositor.
Calibration and verification — simple checks you can trust
Portion accuracy matters for cost control and customer expectations. A short verification routine every shift catches drift before it affects a whole batch.
Suggested verification steps:
- Run a short sample and weigh portions from several random nozzles. Record and compare to nominal.
- Check that the variance across nozzles falls within your in-plant tolerance. If variance grows, look at pump and nozzle wear first.
- Keep simple trend logs; small drifts over time tell you about wear or creeping temperature control issues.
Calibration is not one-and-done. Treat it as a routine like oil checks on a vehicle.
Operator training — the multiplier effect
A well-trained operator reduces calls to maintenance and short circuits in production.
Training essentials:
- Teach operators what "normal" sounds, smells, and visuals are for your specific depositor. Sensory cues catch problems early.
- Train in startup and shutdown routines with reasons behind each step. Understanding reduces shortcutting.
- Document standard operating procedures and make them accessible. Keep the language simple and include photos for tricky steps.
- Run short refresher sessions when recipes change or when seasonal factors (ambient temperature swings) affect performance
An operator who knows why a hopper lid stays closed during startup is an operator who keeps the line running.
Troubleshooting scenarios and what to try first
A concise set of troubleshooting moves helps teams act confidently..
Scenario: sudden underfill across the head
- Check hopper level and feed temperature.
- Inspect for air in lines.
- Swap in a clean nozzle.
- Review pump drive for slipping.
Scenario: inconsistent fills between nozzles
- Check supply manifold for blockages.
- Verify nozzle alignment and valve timing.
- Confirm pump suction is even across ports.
Scenario: surface finish problems post-cooling
- Look at temperer stability and transfer runs.
- Check conveyor timing into the tunnel.
- Observe deposit profile—soft edges suggest pressure spikes.
Follow the small steps first; they catch the majority of issues. Save major component changes for when you have isolated the fault.
Purchasing and specification — what to ask your supplier
When you buy or upgrade a depositor, ask for plain answers on these points:
- What maintenance items should be stocked locally? Get a list.
- Can the supplier provide a start-up checklist and training on arrival? A short session reduces early failure risk.
- What control and feedback signals does the depositor expose? More accessible data eases troubleshooting.
- How easy is it to swap nozzles and reason about head alignment? Ergonomics matter.
- What spare parts lead times are typical? Match those to your inventory strategy.
A good supplier treats installation as part of the machine's cost, not an optional extra.
Small changes with large returns — a short list
Here are a few modest changes plants can try that often have outsized effects:
- Keep hopper lids closed during warm-up.
- Insulate short lines and hoppers to reduce temperature drift.
- Use a simple daily verification weigh routine on a small sample.
- Label and store nozzle profiles so operators can swap quickly.
- Maintain a small kit of common seals and fasteners at the line.
These are low-cost, low-risk steps that reduce tinkering and stabilize output.
Checklist you can use tomorrow
Copy this into your shift handover or production binder:
Confirm temperer and hopper at steady temps before starting.
Run a short sample and weigh portions from multiple nozzles.
Check for air in feed lines and purge if necessary.
Inspect nozzle faces and swap if any show build-up.
Verify pump sound and smoothness; note any unusual tones.
Confirm conveyor timing and tunnel entry points.
Record observations and any interventions.
A short routine like this prevents many of the late-night calls that waste everyone's time.
Keep it practical, and the machine will keep working
A depositor is not magic. It rewards attention to basic inputs: material, mechanics, and process control. Spend a little time tightening those areas and you get a steady machine that reduces surprises and trims waste. The practical tips here are modest in scope but proven in practice. If you build them into your routines, you'll notice fewer mornings spent hunting for the cause of uneven fills — and that, for a shop floor, is a real win.